Imagine transforming a simple piece of lumber into a stunning, functional work of art for your home.
The Design Inspiration Behind My DIY Console Table
This project is ideal for beginners, offering a quick and straightforward DIY experience. Let me run through an overview of this build.
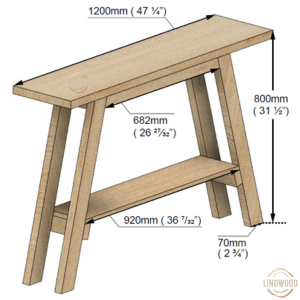
When I set out to create my console table, I wanted a piece that embodied simplicity, clean lines yet welcoming—after all, it’s the first thing I see when I walk through my door.
I opted to keep the design straightforward and easy to assemble in a day. The legs of the table were only stained to retain their natural beauty, adding a touch of warmth to the overall look.
More than just a decorative item, this console table serves a practical purpose in my daily life. It’s not just about displaying fancy ornaments; it’s about having a convenient spot to store everyday essentials, like keys or reminders, as I dash out the door.
Essential Tools for Starting Your Console Table Build
Having the right tools from the start can significantly enhance your efficiency. However, if you’re just starting out, it’s absolutely fine to work with what you have and gradually expand your tool collection as you progress.
Here is a list of what you’ll need for the project:
Mitre saw or circular saw
Cordless drill driver
Cordless drill impact
Pilot countersink bit (optional)
Speed square
Straight edge minimum1200mm
Clamps
Random orbital sander
Material Guide
The only significant expenses were for the water-based varnish and timber stain. In total, the DIY console table build cost me around $30. Winning!
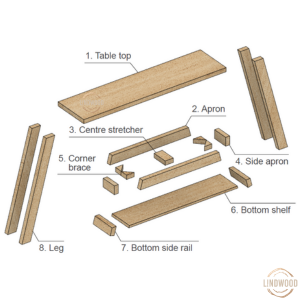
Tabletop: As a thrifty creator, I often collect timber. Fortunately, I had a piece of hardwood in my collection ready to be repurposed for the tabletop. Alternatively, you could use pine.
Bottom Shelf: I used old fence palings. After sanding them down, I cut them into strips and glued them together. Once dried, I cut it to size. This really kept the price down. Alternatively, your local hardware store would have a whole piece that you could cut to size
Legs: The legs were crafted from salvaged construction pine 70x30mm (2″x1″) left over from a previous job.
The Finish
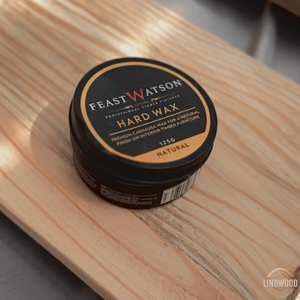
Tabletop: The tabletop had a beautiful golden ash colour that I wanted to preserve, so I applied two layers of clear water-based varnish to protect it.
Bottom Shelf and Legs: I needed to colour-match the bottom shelf and legs to the tabletop since they were lighter. I used Interbuild Hardwax Oil in Golden Teak to stain the bottom shelf and legs, ensuring they match the tabletop.
I tested a small amount of stain on the offcut timber to verify the desired results, as each piece of timber absorbs colour differently. If you plan to stain your console table, be sure to follow this step.
Ready to Build Your Own Console Table?
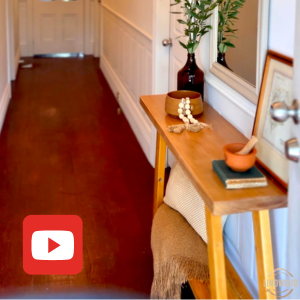
The construction process of this Console table can be found on my YouTube channel @_lindwood!
If you’re ready to build your own console table and get creative with your project, click below for the detailed step-by-step plans.

Recent Comments